Most people have seen and often admired the stained glass that sits prominently in the windows of various churches and sometimes even lampshades. But, have you ever wondered just how the stained glass is made or if you can do it at home?
You can make stained glass projects at home with glass sheets, a pattern, glue, paint brushes, and a Xacto blade. While it may not be the exact way the professionals do it, if you follow the proper steps, you can make a beautiful stained glass window for your home.
Whether you are just beginning or have been trying your hand at stained glass for some time, there are specific steps and precautions that you should consider. Now, let’s look at what stained glass is and how you can begin creating your designs at home.
What is Stained Glass?
It is widely known that stained glass is a decorative design that is skillfully put together to create a specific image or pattern. Made from various pieces of colored glass, they can be pieced together to create a mosaic design.
Stained glass is often seen in many churches worldwide and is often admired for its unique designs. Many stained glass projects are created to tell a story or depict a certain feeling or emotion.
How is Stained Glass Made?

Stained glass refers to glass skillfully designed with various materials such as metal oxides and salt. These colored pieces of glass are then fused to create a mosaic-type design that contains various patterns and images.
Professionally made stained glass is made by putting together various pieces of colored glass in a specific way and then fusing them. The fusing process is typically done by soldering the edges together.
If you are just getting started with making stained glass at home, there are a variety of other methods you can use. While soldering pieces of glass together are the most used method of creating stained glass, it is certainly not the only way.
Many DIYers have chosen to steer clear of the soldering iron, at least when just beginning to create stained glass designs. Instead, you can create beautiful designs at home with glass and a few supplies you probably already have at home.
What Supplies Do I Need to Make Stained Glass?
Whether you have decided to create your stained glass projects using traditional or nontraditional methods, you should still ensure you have everything you need to get started. While many supplies may already be within your grasp, you may have to search for others.
The supplies you will need depend entirely on whether you are using the soldering method of creating stained glass designs or the beginner’s method. The bottom line is that you must be prepared before getting started.
Stained Glass Without Soldering
Glass Sheets
Many people use sheets of glass, such as the type used for picture frames. These glass sheets (on Amazon) can be used to give you an interesting design for your project.
Stained Glass Pattern
While you can certainly create your pattern, there are also ones you can purchase that take less time. Keep in mind that if you are starting, you may want to stick with a simple design.
Glue
This is to create the edges that most experienced people use to solder their designs together. Whatever glue you choose, you will mix it in with some of the paint you will use to create your designs.
Acrylic Paint
Finding the right paint to create the amount of transparency needed for your stained glass project will help your design look professional. You should buy paint specifically designed for glass projects, like these Magicdo Stained Glass Paints (on Amazon).
Paint Brushes
You will use these to add paint to your glass while making your design. Choosing a wide variety of sizes will ensure you have what you need when you need it.
Xacto Blade
You can expect mistakes along the way as you create your designs, especially if you are just starting. This is why it is necessary to have a sharp blade like a Xacto knife handy.
Stained Glass With Soldering
You will need additional supplies if you choose to use traditional stained glass design methods. While many of these supplies are more expensive, if you want to make your stained glass stand out from the rest, you will need to make some investments.
Here are some of the additional supplies you will need:
Glass Cutter and Pliers
Whether a beginner or a seasoned stained glass creator, you will need a glass cutter that fits your needs. Some are designed specifically for those just starting. This Sweet Stained Glass Toolkit (on Amazon) has everything you need to get started.
Copper Foil
This is used as a backing to your stained glass and works to hold your glass pieces together. They come with an adhesive side, so you do not have to worry about your glass moving around during the process.
Soldering Iron
Choosing the right soldering iron for your project means that you should look for one made to be used with glass. You should also ensure that your soldering iron is designed specifically for stained glass projects, like this Weller Soldering Kit (on Amazon).
Grinder
This tool allows you to grind the edges of the glass to make them smoother and easier to work with. This Inland Glass Grinder (on Amazon) is the perfect choice for beginners and experts alike.
Glass-Staining Tips to Keep in Mind
As with most DIY projects you choose to create, certain tips make the process go more smoothly. These tips typically come from people who have gone through the process and can give you ideas to make things go better for you.
Here are a few tips you should consider when creating your stained glass designs:
Glass Choice is Important
While many different types of glass are available, it is important to choose the right one for your project. Most experts recommend using either Cathedral for a more transparent look or Opalescent if you want a more opaque look to your glass.
Plan in Advance
From the design pattern you are going to use to the paint combinations, you should plan your project. This will save you time and keep you from making mistakes while working on your stained glass project.
Use Safety Gear at all Times
Whether using the traditional soldering or paint method, you must protect yourself and your environment. This means ensuring you have certain safety gear readily available and use during the process. Some safety gear you should have includes gloves, masks, and goggles.
How to Make Stained Glass at Home
When creating stained glass projects at home, there are two methods you can use depending on your level of expertise. If you are just starting, you may want to go with a method that requires fewer materials to get used to the process.
For those who wish to create stained glass under the traditional method, keep reading for a step-by-step guide.
Step 1: Collect Your Materials
Before you can get started on your chosen design for your stained glass, you need to ensure that you have everything ready to go. The materials listed in the previous section can help you with getting started.
Having your workstation set up before getting started will save you time once you get going on your project. However, if you plan to work with stained glass for a while, you may want to have a dedicated workspace already set up.
Step 2: Create Your Design
While many people choose to purchase pre-made designs, you can certainly sketch out your pattern or image. This will depend entirely on the design you are wanting to create and what abilities you have.
Once you have decided what to create, you will need to blow it up large enough to fit the glass you have chosen to use. This means using a copier machine or a projector or drawing the design freehand if you have the chops.
Step 3: Transfer Your Design to the Glass
After you have your image exactly how you want it, you will need to recreate the design onto your chosen glass. This can be done in various ways depending on what you have on hand to use.
A lightbox is the best way to ensure you get the exact design you want onto your glass. However, if you do not have access to one, you can always have your design on paper that you cut out into various sections to trace onto your glass.
Step 4: Cutting Your Design
It is essential to remember that cutting the glass is a delicate process and should not be rushed through. Cutting straight lines can be much easier than tackling curved lines since they are more accurate.
When cutting curved lines, you must be gentle yet apply firm pressure with your Xacto knife or other blades. It may also be necessary to either tap the glass with your blade as you go or use pliers when you need them.
Step 5: Grind the Glass Pieces
Once your design is cut out, you need to use a grinder to smooth the pieces. This process is essential because it will make the fusing go much faster since the pieces will fit together seamlessly.
Make sure you are not rushing the grinding process, or you may find yourself with pieces of glass that are chipped. If you have any leftover pieces, you will need to return to your glass and make the chipped one again.
Step 6: Add Copper Foil
After you have cut your glass pieces and used the grinder to make the edges smooth, you are ready to add your copper foil. While this process is relatively simple, it can take some time, so patience is important.
To do this, take each glass piece and line the edges with the right size of copper foil. Of course, you will need to be careful that you are lining it up perfectly to avoid having to start over again.
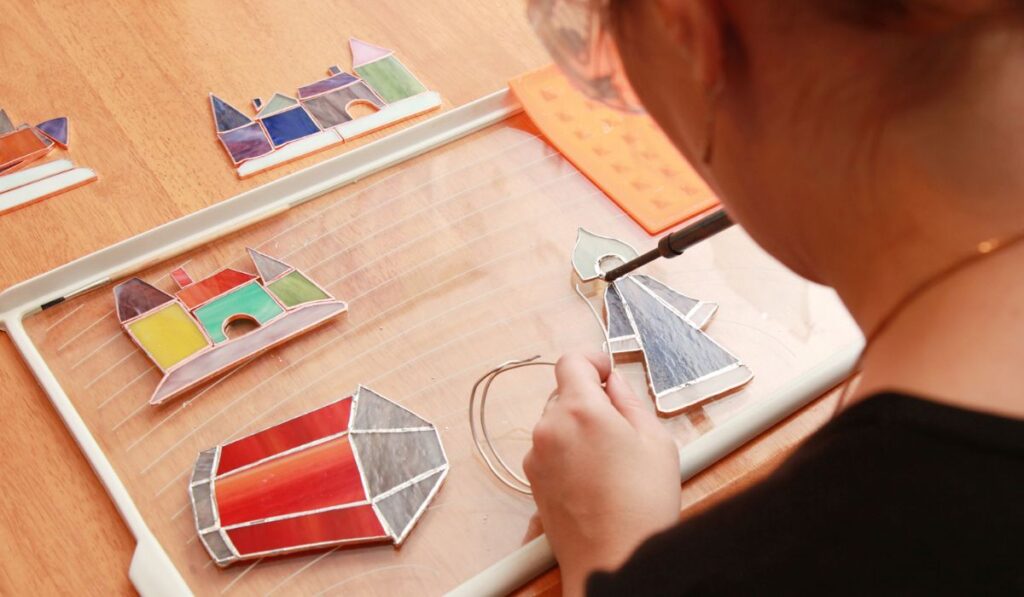
Step 7: Solder Your Glass Pieces
The final step is to fuse your pieces to create your design. Remember that this consists of several small steps along the way. While most suggest using a flux to line your copper foil, others state that it is unnecessary.
Here are the three steps you need to follow to ensure that you have soldered your design properly:
Tack Pieces Together
While flux is not necessary, many people choose to use it at this step. To do this, you will need to add a small amount of flux to various areas along the copper foil. You should also add a small amount on top of the pieces you are fusing.
Tin the Seams
To do this, you will need to add flux if you choose and then solder to the seams of the design. You must ensure that you have covered all of the copper foil with the solder.
Solder Your Design
Adding another layer of flux and then the solder will ensure that your design is fused correctly. Then you can use your soldering iron to go back and forth across the seams to ensure that it is completely fused.
Final Thoughts on Making Stained Glass at Home
The bottom line of making stained glass at home is that you have a couple of methods to choose from depending on your comfort level. You can easily create beautiful designs unique to you with either method put in any window to be admired for years to come.